Friday, December 20, 2013

Spellbinders Easy Treat Bags

 Here are the treat bags I made for my White Chocolate Popcorn, 
Peppermint Bark and Dipped Pretzels.
First I cut out of decorated lunch bags S5116 Die #4
I left them closed so it cut out front and back
 Then I cut out Transparency Film the Largest die #5 from S5116
2 for each bag one front one back
 I cut the largest die out of red cardstock and white out of die #3
 I used my Heirloom Stamps, Wink of Stella Brush Tips, Archival Inks in Red Geranium & Fern
I used the Tim Holtz Waterbrush to color the leaves in Fern and the Wink of stella for the center of the berries and the clear to go all over my stamped image
 I used 1/8 inch Scor Tape on the Transparency and adhered inside both front and back for my window to see the goodies I made as shown here.....
 Then I added my Heath Bar White Chocolate Popcorn
 & Peppermint Bark along with Dipped Pretzels for my gifts
 Hope I have inspired you!
HAPPY HOLIDAYS!


Wednesday, December 18, 2013

NEW STAMPS

New BIG & small Says it All Stamp Set coming soon

Sunday, December 1, 2013

Spellbinders Dies & Vinyl Gifts

create beautiful gifts this holiday season.... 
See video below for step by step
on how to create!

Tuesday, November 26, 2013

New Stamps

New Stamps Coming in December
I designed these popular words to use individually or sentiments
Perfectly sized for your cards!
 

Sunday, November 17, 2013

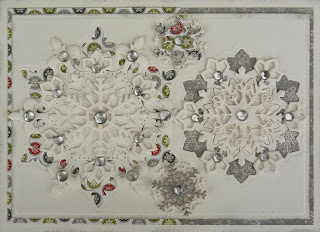
Spellbinders Snowflake Cards

 After I was on Spellbinders Try it Tuesday I received a lot of emails asking for a video to give
closeup directions..... so here you go.....video is below....

Sunday, October 20, 2013

Spellbinders Gold Round 1 Gift

 Friend Frame Gift using Spellbinders Gold Rounds 1 Dies

Here are all the dies cut and embossed/debossed using Memento inks
and the video here shows step by step

Sunday, October 6, 2013

Spellbinders Snowflake Card Creator Card

 Here is a Beautiful Snowflake card I created using Spellbinders 2013 Snowflake Pendants
A close up of my card
Here is the video showing how I created my card.

Friday, September 20, 2013

SPELLBINDERS NEW DIES BLOG HOP

Welcome to the Spellbinders Preferred Partner Blog Hop! 
Please see Hop information at bottom of post and for your chance to win either a set of Pearl Effects or Tile Works Card Creator Dies!

Today I am excited to share my card I created
using the dies I designed for Spellbinders
Pearl Effects Card Creator Dies

I used all of the dies in the set for my project except the flower shaped die. I also used the following items on my card:
Teal Zeal, Toffee, Morocco & Tux Black,
Tim Holtz Stamp Sets Mini Halloween 3 & Odds Ends and a Spider Web from the dollar store for added dimension.

 BLOG HOP INFORMATION:
Please visit these blogs to view other Amazing Projects
created using the Newest Spellbinders Release dies.
Leave a comment for your chance to win a set of
 Pearl Effects Card Creator Dies from Cindy Echtinaw Designs & A 2nd winner will receive Tile Works direct from Spellbinders Paper Arts!!!!!

Cindy Echtinaw (You are HERE..)
NOTE: If you got here from my NEWSLETTER or FACEBOOK make sure to go back to Cathy-Lynn's Blog  
2 Random winners will be drawn on September 30th
CONGRATS! THE WINNERS ARE:
MOOSISK
&
VICKI KERTZ 
PLEASE contact me with your shipping address!


Thursday, September 19, 2013

Gesso, Inka Gold, Spellbinders Dies Birthday card in Frame

 I bought this wood frame from Macy's

 Using Gesso, Metallic Silver paint and a piece from an onion bag
I painted and textured the frame.

 After it dried I used a rag and applied Inka Gold in Silver
Here is before and after you can click on the photo to see close ups


 I used Spellbinders Elegant Labels 4 Card Creator Dies and
stamped using my Floral Friendship and What a Swirl Stamps

 I found a beautiful ribbon to wrap around and used the tags from
the Elegant Labels 4 Dies and stamped Happy Birthday so I can gift it to my friend
who has everything!  This matches her new condo I am
helping her move into in a few weeks!

HERE IS THE VIDEO SHOWING STEP BY STEP!


Sunday, September 1, 2013

Spellbinders Majestic Labels 25 Card

I LOVE all the New Spellbinders Dies but one of my favs is the New Majestic Labels 25 Dies
Since I have Matching Stamps to the set I had to create a fun fall card with them.
I used the following items to create my card.
Spellbinders 5 x 7 Matting Basics A & B
Spellbinders Layer Creator
Spellbinders Majestic Labels 25
Spellbinders Labels 25
Cindy Echtinaw Designs Floral Blessings Stamps
Eleganza Web Ribbon inked with Walnut Stain ink
 

Sunday, June 23, 2013

Spellbinders Layered Card

Ornate Squares and Medallion 7 Spellbinders Dies were used.
I used Bitty Blossoms for Rose cut from a coffee filter!


Here is the Video to show you how I used the dies to layer this card.

Sunday, May 26, 2013

Quick Spellbinders Card Creator Dies Card

 To Create this card I used Spellbinders Card Creator Locking Loops, 
Card Creator Basics A die #4, Les Papillions 2 and my sewing machine on Zig Zag.

Cut 1 of Locking Loops Largest Die and both elements from the set out of
Coredinations Cardstock.  Cut 1 Basics A die #4 out of Rose Garden Polka Dot Cardstock. Cut 1/2 and sew onto Locking Loops die using a ZigZag Stitch.  Cut one of the Butterflies (2 pieces) one from the pattern and one from the plain.  Run ribbon thru the Locking Loops accent piece and tie in a knot place the other loop element on top.  Adhere all pieces as shown above

Products Used
After Zig Zag Sewing


Sunday, April 7, 2013

Spellbinders Shaped Dimensional Card

 I created this card using every size die in

Video below on how I created this card.
Leave me a comment for your chance to win
a set of All Dressed up Stamps
winner chosen on April 15th

Sunday, March 17, 2013

Viva Decor Stamp Paint Easy Resist Techniques

 Below is a Video showing how I created theese
 3 cards using Viva Decor 3D Stamp Paints and
 Close ups of the cards & Glossy Cardstock and Tags

Here is the video showing how to create these cards.

Saturday, March 2, 2013

Spellbinders Explore Beyond Blog Frenzy Day 6

Hello Blog Friends
It's Blog Frenzy Time and I am so excited you are here!!! Today is my turn to show you
5 of the New Spellbinders Nestabilities Card Creator Dies!  I love designing these! It is
my Happy Place and truly an honor to be able to share these fun designs with you!
  I have used my Locking Loops, Floral Ribbon Threader, Distressed Edges,
along with Curved and Matting Basics A and B Dies to create my projects here.


First is my Locking Loops Card
I used all 5 dies in the set to create this card.
My finished Easter Card
Center of the card showing custom colored Pearls in center of smallest die in set
A close up of the detail in the Locking Loops Design
I USED THE E-6000 SPRAY GLUE to adhere all my layers!

 Supply List
  1. Spellbinders Nestabilies Card Creator Locking Loops S5-175
  2. Spellbinders Nestabilites Card Creator Matting Basics A S5-131
  3. Tim Holtz Dusty Concord Cardstock and Distress Ink
  4. My Minds Eye Fiddlesticks Cardstock
  5. Cindy Echtinaw Designs Clear Stamps Words and Typewriter for a chance to win this set see ***Below at bottom of Blog Post.
  6. JustRite Autumn Tags Clear Stamps
  7. Pearls and Copic Markers used to custom match them to my Cardstock.
  8. E6000 Spray Glue! I LOVE THIS NEW GLUE for intricate designs such as these you just spray and there is no mess, smell and it bonds beautifully! Available Mid March!

Note: As you can see I did not use the outermost die in this set to cut. I simply
cut the design without the outside cut die directly into my Curved Basics A dies.
My finished Card
A close up so you can see the detail and Metallic Pearl Paint


  Supply List
  1. Spellbinders Nestabilities Card Creator Floral Ribbon Threader S5-176
  2. Spellbinders Nestabilities Card Creator Curved Basics A S5-171
  3. Tim Holtz Spun Sugar Cardstock and Distress Inks
  4. Lucy Cromwell Cardstock
  5. Tim Holtz Metallic Pearl Paint 
  6. E6000 Spray Glue!

So now let's EXPLORE BEYOND with a FUN TECHNIQUE!
 This Card is made using the Distressed Edges Dies and Floral Ribbon Threader Dies
 My Finished Card uses the Scor Pal, Distressed Edges and the Flower from Floral Ribbon Threader Dies

Here is how I created the Pattern above.........
 
 Using the Scor-Pal score Cardstock every 1 inch. 
Turn paper and score again at every inch on diagonal.

 
Use the Flower from the Floral Ribbon Set inside each square.  Make sure to tape so you have the flower in the center of each square you choose before die cutting.
Take Dusty Concord Distress Marker and the Tim Holtz ruler and draw stitch marks on the score line.
Then die cut using the largest die from the Distressed Edges Set

By leaving Cardstock in the die it gives you a white crisp outside emboss line like this :)

 This is a closeup of the scoring, stitching, and flower cut outs.

Layer onto Seedless Preserves Cardstock using E6000 Spray Glue

 
Cut two of the rectangle dies from the Distress set (Largest in seedless, smallest in White)
Cut one flower outside from Floral Ribbon Die and Stamp SEW inside and draw stitches.
Stamp sentiment onto white Cardstock from Sew Sayings Clear Stamps.
Ink edges with Dusty Concord and add buttons to finish card.


*** BONUS DRAWING for a chance to win the Cindy Echtinaw Designs Stamp Set below, Please leave me a comment here on my blog as to which card above is your favorite or which NEW Card Creator Die is a must have for you. I will draw ONE lucky winner
on March 10 to receive my New Cindy Echtinaw Designs Words and Typewriter Stamp Set here
that I used on my Easter Card Above. 
CONGRATS CATHY R for your comment and winning
please contact me with your address to ship your stamps!
Thanks everyone for your comments!